1. 구글 개발자 콘솔에 로그인한다. 

console.developers.google.com/


Google Cloud Platform

하나의 계정으로 모든 Google 서비스를 Google Cloud Platform을 사용하려면 로그인하세요.

accounts.google.com


2.  접속하면 동의란이 뜨는데 체크 후 계속하기 버튼을 누른다. 


3. 프로젝트를 생성해준다. 


4. 프로젝트 이름을 입력하고 만들기! 


5. 검색란에 google api를 검색해서 클릭한다. 


6. API 사용버튼 클릭! 


7. 좌측 메뉴에서 사용자 인증정보 클릭-> 동의화면 구성 클릭


8.  앱이름과 이메일, 로고 파일등을 입력한다. 테스트용으로 사용할거라 localhost로 설정! 


9.  좌측 메뉴에 사용자 인증정보 메뉴 > 사용자 인증정보 만들기 > 클라이언트 ID 클릭 


10. 양식 작성 


11. 만들기를 누르면 키가 생성되는데 잘 저장해둔다! 

12.  리다이렉션 받을 uri를 적어주면된다~ 


uri로 영문, 국문 페이지를 구분하는 사이트를 운영하게 되었다.. 

(controller 자체가 국문용, 영문용 따로 생성되어있는.. )

이렇게 되어있다보니 요청한 url에 따라 영/국문 페이지는 잘 나오지만

페이지내 locale 설정값을 통해 나오는 문자와 이미지가 제대로 나오지 않는 이슈가 있었다~ 

예) 로케일이 국문으로 되어있는데 영문 url를 치고 들어오면 국문용 이미지가 출력됨.. ;; 

애초에 로케일 값만 가지고 구축했으면 좋았겠지만 안되어있으니 아쉬운대로 나는 작업을 이어간다.

예전엔 이런걸 보면 왜이렇게 해두는거지??? 했지만 이젠 다 사정이 있겠거니 하는 마음이 든다..ㅎㅎ; 왜지? 


무튼 

hook으로 controller 들어가기 전에 uri 값을 읽어와서 locale 설정을 변경해주는 방향으로 작업하려고 한다. 


시작! 

1. application/config/config.php 에 들어가서 아래값을 true로 설정한다. hooks 활성화 해주는거~ 

$config['enable_hooks'] = true;


2. application/config/hooks.php 사용할 hooks 선언을 해준다. 

$hook['post_controller_constructor'] = array(
	'class'    => 'Locale_init', // 클래스명, 그냥 파일명이라고 생각해도 될듯 
	'function' => 'inits', // 그안에 내가 쓸 함수명 
	'filename' => 'Locale_init.php', // 실제 파일명 
	'filepath' => 'hooks' // 저장된 경로이니 특별하지 않다면 그냥 두기 
);

$hook[''] 에 들어가는 값은 여러가지 타입이 있는데 내 사용용도에 맞게 적어주면 된다. 

나는 컨트롤러가 인스턴스화 된 직후 진행하려고 post_controller_constructor로 설정했다.

pre_system 
 - 시스템 작동초기입니다.벤치마크와 후킹클래스들만 로드된 상태로서, 라우팅을 비롯한 어떤 다른 프로세스도 진행되지않은 상태.
pre_controller 
- 컨트롤러가 호출되기 직전. 모든 기반클래스(base classes), 라우팅 그리고 보안점검이 완료된 상태.
post_controller_constructor 
 - 컨트롤러가 인스턴스화 된 직후. 사용준비가 완료된 상태. 하지만, 인스턴스화 된 후 메소드들이 호출되기 직전.
post_controller
-  컨트롤러가 완전히 수행된 직후.
display_override
-  _display() 함수를 재정의. 최종적으로 브라우저에 페이지를 전송할 때 사용됩니다. 이로서 당신만의 표시 방법( display methodology)을사용할 수 있음. 
   주의 : CI 부모객체(superobject)를 $this->CI =& get_instance() 로 호출하여 사용한 후에 최종데이터 작성은 $this->CI->output->get_output() 함수를 호출하여 할 수 있음

cache_override 
- 출력라이브러리(Output Library) 에 있는 _display_cache() 함수 대신 당신의 스크립트를 호출할 수 있도록 해줌. 
  이로서 당신만의 캐시 표시 메커니즘(cache display mechanism)을 적용할 수 있음
post_system 
- 최종 렌더링 페이지가 브라우저로 보내진후에 호출


3. application/config/configLocale_init.php

파일을 생성하고 원하는 작업을 코딩한다. 

<?php
defined('BASEPATH') OR exit('No direct script access allowed');


class Locale_init  {
    private $CI;
 
    function __construct()
    {
        $this->CI =& get_instance();
 
        if(!isset($this->CI->session)){  //Check if session lib is loaded or not
              $this->CI->load->library('session');  //If not loaded, then load it here
        }
    }
 
 
    public function inits(){
     
        $CI =& get_instance();
        $CI->load->library('session');   
        $uri= $_SERVER['REQUEST_URI']; //uri를 구합니다.
	
		
		$pieces = explode('/', $uri);
		
		if(isset( $pieces ) && count($pieces) > 1) { 
			$this->CI->session->set_userdata("__ss_lan", $pieces[1] );
			$lan = $this->CI->session->userdata("__ss_lan");
		}
		
    }
}


이제 실행해보면 잘된당~~ 


* 저는 php 개발자는 아니지만.. 임시적으로 운영중이니 코드에 이슈가 있다면 코멘트 남겨주세요! 

배우는 것을 좋아합니다~~~!! 


'PHP' 카테고리의 다른 글

PHP Codeigniter 쿼리 찍어보기  (0) 2021.02.22


git 사용중에 push를 하려는데 계정을 입력하고 나니 에러가 발생했다. 

fatal: Authentication failed for "~~~~ "


계정 정보가 일치하지 않을때 나오는 에러인데  나와 같은 GIT 초심자의 경우 당황할 수 있으니 기록해둔다. 


1. 입력한 아이디와 비번이 정확한지 확인한다.

 -  git or  gitlab 로그인할때 사용하는 계정을 입력하면된다.

   (손가락이 연달아 실수하는 일이 있으니 잘적어보기!! ) 


2. 최근에 비번을 변경했다면 git 설정 초기화를 진행한다. 

git config --system --unset credential.helper 


그리고 다시 해보면 성공!! 


gitlab에 프로젝트를 올리려고 push를 진행했더니 에러가 발생했다. 

git push -u origin master 


에러발생! 

unable to access 'https://~~~.git/': peer's certificate issuer is not recognized.


올리려는 프로젝트 디렉토리에서 SSL설정을 false 해준다. 

git config --global http.sslVerify false


그리고 다시 시도하니 잘된다!

아이디 비번은 gitlab 로그인에 사용하는 계정 정보를 넣으면됨! 

작업환경 : Spring Framework + thymeleaf + jqgrid 

jqGrid 를 이용해 출력된 데이터를 바로바로 수정하고 싶다. 

jqGrid 의 수정기능을 사용해 적용했다 아래 코드로 하면 cell 더블 클릭 후 값을 입력하고 엔터키를 

누르면 즉시 수정되는 코드이다. 


나중에 다시 사용하기 위해 아주 간단한 흐름으로 정리했다~ !


* 미래의 나를위한 메모 *   

실제 파일에서 사용된 텍스트를 포스팅을 위해 customer 변경한 부분이 있음 에러가 있다면 알아서 수정해서 쓰기! 


Controller 

@Controller
@RequestMapping("/customer")
public class CustomerContorller {
	@Autowired CustomerService customerService;
		
	@RequestMapping(value = "/getList", method = RequestMethod.POST)
	public ModelAndView getList() {
		ModelAndView mv = new ModelAndView("jsonView");
        mv.addAllObjects(customerService.getList());
        return mv;
	}		
	
	@RequestMapping(value = "/mod", method = RequestMethod.POST)
	public @ResponseBody Map<String, Object> mod(customerVO customerVO) {
	        return customerService.mod(customerVO);
	}
	
	@RequestMapping(value="/getMainPage", method= RequestMethod.POST)
	public ModelAndView customerMain() {
        ModelAndView mv = new ModelAndView("customer/main");
        return mv;
    }
}


Service 

@Service
public class CustomerService {
	private static final Logger logger = LoggerFactory.getLogger(CustomerService.class);
	
	@Autowired protected CustomerDAO customerDAO;
	
	public ModelMap getList()  {
		ModelMap mv = new ModelMap();
        try {
            mv.addAttribute("rows", customerDAO.list());   
        } catch (Exception e) {
            logger.error("{}", " 리스트 조회 실패 - " + e.getMessage());
        }
		return mv;
	}
	
	 
	@Transactional
	public Map<String, Object> reg(CustomerVO customervo) { 
		Map<String,Object> resMap = new HashMap<String,Object>();
		try {
			if(StringUtils.isEmpty(customervo.getName()) || customervo.getAge() == null ) { 
				throw new Exception();
			}
			customerDAO.reg(customervo);
			resMap.put("res", "SUCCESS");
		 } catch (Exception e) {
			resMap.put("res", "FAIL");
			 logger.error("{}", "등록 실패 - " + e.getMessage());
        }
		return resMap;
	}
	
	@Transactional
	public Map<String, Object> mod(CustomerVO customervo){ 
		Map<String,Object> resMap = new HashMap<String,Object>();
		try {
			if(StringUtils.isEmpty(customervo.getName()) || customervo.getAge() == null ) { 
				throw new Exception();
			}
			
			customerDAO.mod(customervo);
			resMap.put("res", "SUCCESS");
		 } catch (Exception e) {
			resMap.put("res", "FAIL");
			 logger.error("{}", "수정 실패 - " + e.getMessage());
        }
		return resMap;
	}
}


DAO 

@Repository("CustomerDAO")
public interface CustomerDAO {
	  
    public List<CustomerVO> list();
    public int reg(CustomerVO customervo);
    public int mod(CustomerVO customervo);
    public int del(CustomerVO customervo);
    
}


main.html

<script src="/js/customer.js?20210126"></script>

<div id="div_customer">
    <br/>
    <div id="div_customer_jqgrid">
        <table border="1" id="tbl_customer" style="overflow: auto" summary="고객 목록 조회."></table>
        <div id="pager_customer"></div>
    </div>
    <div id="div_customer_page"></div>
</div>


customer.js 

$(function(){
	selectCustomer();
});


var selectCustomer = function () {
    $("#tbl_customer").jqGrid('GridUnload');
    
    $("#tbl_customer").jqGrid({
        url: '/customer/getList',
        ajaxGridOptions: {contentType: 'application/json; charset=utf-8'},
        mtype: "POST",
        postData: {},
        serializeGridData: function (postData) {
            return JSON.stringify(postData);
        },
        datatype: 'json',
        height: 'auto',
        
        cellEdit: true, 	 
        cellsubmit: "remote",
        cellurl: "/customer/mod",
        beforeSubmitCell : function(rowid, cellname, value) {   // submit 전
            return {"name":rowid, "age":value}
        },
        width: '50%',
        shrinkToFit: false,
        multiselect: false,
        gridview: true,
        colNames: ['이름', '나이'],
        colModel: [
            {
                name: 'name',
                index: 'name',
                width: 120,
                align: 'center',
                title: false,
                sortable: false,
                resizable: true,
                key: true
                
            },
            {
                name: 'age',
                index: 'age',
                width: 120,
                align: 'center',
                title: false,
                sortable: false,
                resizable: true,
                editable:true,
                editoptions:{ dataInit: function(element) {userClassCode_number(element);}}
            },
        ],
        viewrecord: true,
        rowNum: 20,
        pager: "#pager_customer",
        emptyrecords: "Nothing to display",
        jsonReader: {
            page: 'page',
            total: 'total',
            root: 'rows',
            records: 'records',
            repeatitems: false,
        },
        beforeRequest: function () {
            $("#pager_customer").hide();
        },
        gridComplete: function () {
            $("#pager_customer").appendTo('#div_customer_page');
            $("#pager_customer").show();
        },
        loadComplete: function (data) {
            $("#div_customer_jqgrid").css("visibility", "visible");
        },
        loadError: function (xhr, status, error) {
            console.log(xhr);
        },
    });
}

//숫자만 입력 가능하게
function userClassCode_number(element){
    $(element).keyup(function(){
        var val1 = element.value;
        var num = new Number(val1);
        if(isNaN(num)){
         element.value = '';
        }
       });
}


1번 동그라미를 보자 

cellEdit: true,  수정기능을 사용학 위한 옵션이다.
cellsubmit: "remote", 
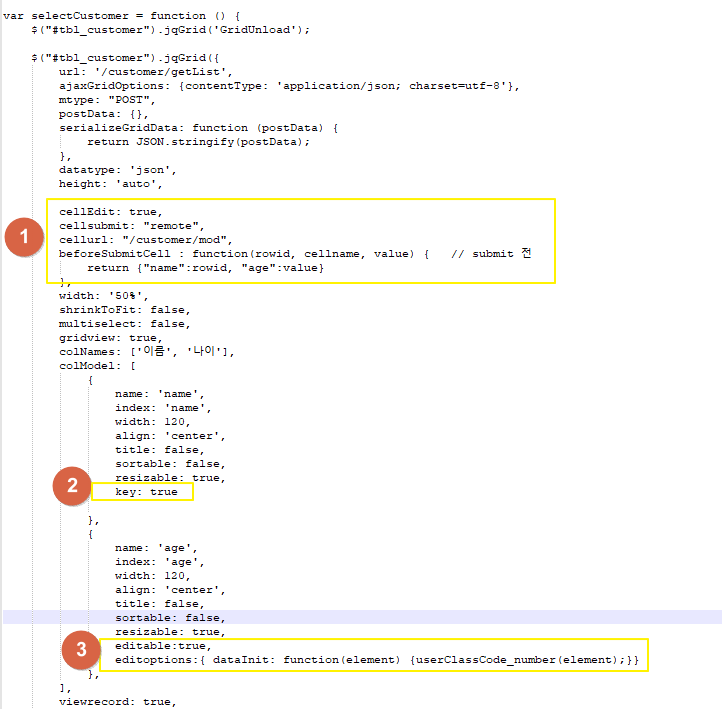
cellsubmit은 두 가지 속성 'remote'와 'clientArray'가 있는데 remote는
저장하는 순간 cellurl로 ajax를 타고 간다.
clientArray는 ajax를 타지 않고 어떤 다른 이벤트 (클릭해서 저장같은) 를 통해서 데이터를 처리해줘야한다. 즉, 바로 ajax태우지 않을 것이라는 것이다.
cellurl: "/customer/mod" AJAX 통신할 url 
beforeSubmitCell : function(rowid, cellname, value) { 
            return {"name":rowid, "age":value}
},
AJAX 통신전에 보낼값을 담아준다. 
controller 에서 받을 값들을 정리해 넣는다. 


2번 스탬프를 보면 key : true 설정이 되어있는데 row에서 key 값으로 사용할 데이터에 넣어준다. 

이건 나중에 데이터를 수정하는 경우 DB에 pk 키로 사용된다고 보면된다. 

즉 where 절에 사용될 값으로 설정한다고 생각하면 쉽겠다.


3 수정기능을 사용할 cell 에 설정을 추가해준다. editeditoptions 는 입력받은 데이터 타입을 설정하기 위해서 사용했다. 

나이를 숫자로만 받기위해서 사용함~ 


# 참고 

1004lucifer.blogspot.com/2019/05/jqgrid-cell.html

areumtb.tistory.com/153

+ Recent posts